As far as nail art trends go, Halloween 2024 combines creepy elements with a dash of style. This year’s designs provide the ideal blend of imagination and terror, letting you show off your Halloween zeal in style with anything from shimmering specters to frightening ombre effects. These trendy nail art styles are sure to be a show-stopper this Halloween!!
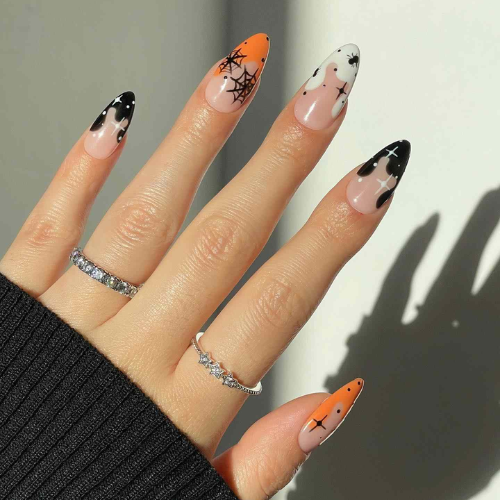
1. Spooky Chic: Orange-Tipped Nails with a Whimsy Twist:
Materials Needed:
- Base coat – OPI Infinite Shine Gel-Like Base Coat 0.5oz for just $14.49 at Beauty Care Choices
- Black nail polish – OPI Infinite Shine Iconic Collection for $14.49 at Beauty Brands
- Orange nail polish – OPI Nail Lacquer 0.5 fl oz for $27.23 at Walmart
- Thin nail art brush or striping tape – Nail Art Line Painting Brushes for $4.94 at Walmart
- White nail polish (for optional details) – OPI Infinite Shine Iconic Collection for $14.49 at Beauty Brands
- Top coat – OPI Top Coat for just $11.99 at Beauty Brands
How To Apply: - Prep Your Nails: Start by washing and shaping your nails. Base coats preserve nails and prolong manicures. Let it dry completely.
- Apply the Black Base: Paint all of your nails black as a base color. For a smooth finish, use one to two coats of polish, depending on the type. Let every coat dry completely.
- Create Orange Tips: Use a small nail art brush or striping tape to paint bright orange polish on your nail tips. Instead of the straight French tip, curve or V-shape the tips for a sophisticated look. Dry the orange polish.
- Add Whimsy Details (Optional): Put tiny white ghosts, stars, or swirls around the orange points for a whimsical touch. Carefully add these details with a thin nail art brush and white lacquer. If you’re not good with freehand, use nail stickers or stencils.
- Seal with a Top Coat: After drying, apply a liberal top coat to seal and shine your design. It will also prolong your manicure.
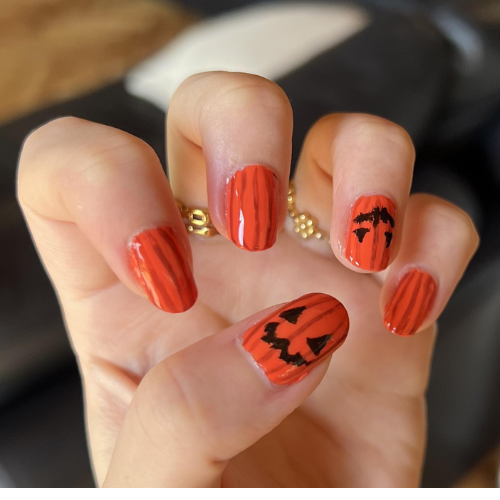
2. Pumpkin-Carved Mani Nails:
Materials Needed:
- Base coat – OPI Infinite Shine Gel-Like Base Coat 0.5oz for just $14.49 at Beauty Care Choice
- Orange nail polish – OPI Nail Lacquer 0.5 fl oz for $27.23 at Walmart
- Black nail polish or nail art pen – OPI Infinite Shine Iconic Collection for $14.49 at Beauty Brands
- Thin nail art brush or dotting tool – Nail Art Line Painting Brushes for $4.94 at Walmart
- Nail art stencils (optional for carving designs) – OPI Infinite Shine Iconic Collection for $14.49 at Beauty Brands
- Top coat – OPI Top Coat for just $11.99 at Beauty Brands
How To Apply: - Prep Your Nails: You can clean, shape, and polish your nails however you like. To protect your nails and make your manicure last longer, use a base coat. Let it dry all the way.
- Apply the Orange Base: Apply vivid pumpkin-orange nail paint to all nails. An even, opaque finish requires 1-2 applications. Dry each coat before continuing.
- Create Pumpkin Craving Designs: Create classic jack-o-lantern faces on each nail using a thin nail art brush or nail art pen. Make triangle eyes and, a jagged mouth, and add some cute, spooky & angry pumpkin faces.
- Add Details: For further detail, use a dotting tool or a small brush to draw vines, foliage, or subtle shadowing around the pumpkins with a darker orange or brown polish to create depth.
- Seal with a Top Coat: After all designs have dried, apply a top coat to seal in the design and add gloss. The top coat also helps to keep your pumpkin-carved mani looking good for longer.
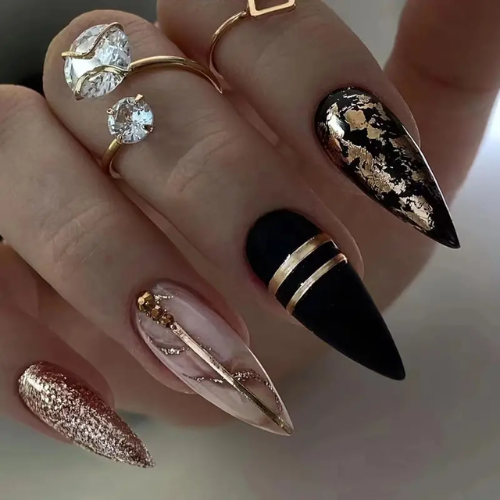
3. Matte Black and Gold Nails:
Materials Needed:
- Base coat – OPI Infinite Shine Gel-Like Base Coat 0.5oz for just $14.49 at Beauty Care Choice
- Matte black nail polish – OPI Nail Lacquer 0.5 fl oz for $27.23 at Beauty Care Choices
- Gold nail polish or gold foil – Essie Glossy Gold Metallic, 0.46 fl oz Bottle for $11.99 at Walmart
- Thin nail art brush or dotting tool – Nail Art Line Painting Brushes for $4.94 at Walmart
- Top coat – OPI Top Coat for just $11.99 at Beauty Brands
How To Apply: - Prep Your Nails: You can clean, shape, and polish your nails however you like. To protect your nails and make your manicure last longer, use a base coat. Let it dry all the way.
- Apply the Matte Black Base: Use matte black nail paint. Full coverage may require 1-2 applications, depending on the polish. Each coat should dry completely for an optimal matte look.
- Add Gold Accents: To embellish your nails with golden highlights, use a small nail art brush or dotting tool. It is possible to make designs like:
1) A manicure with thin golden stripes running along its middle.
2) Triangles and diamonds are examples of geometric shapes.
3) A stylish take on the classic French manicure with golden tips.
4) For a dazzling touch, random spots or speckles of gold.
5). To add a touch of opulence and texture to one or two accent nails, try putting little bits of gold foil. - Apply a Top Coat (Optional): To keep the matte look while sealing the design and stopping chips, use a matte top coat if you like the matte finish. Make your gold details shine using a glossy top coat on those spots and leave the rest of your nails matte.
- Let It Dry: After all designs have dried, apply a top coat to seal in the design and add gloss. The top coat also helps to keep your pumpkin-carved mani looking good for longer.
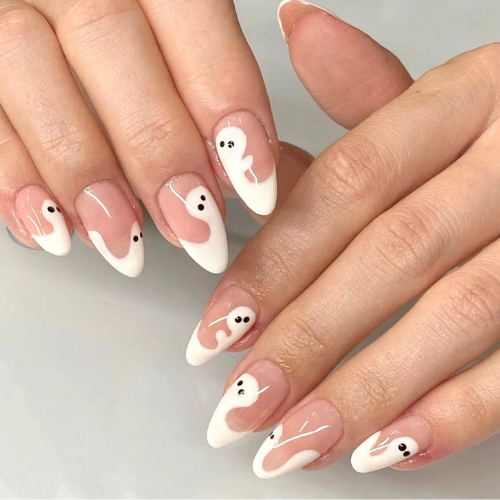
4. Ghosts and Chrome Nails:
Materials Needed:
- Base coat – OPI Infinite Shine Gel-Like Base Coat 0.5oz for just $14.49 at Beauty Care Choice
- Chrome nail polish or chrome powder with applicator – 6pcs Magic Mirror Chrome Nail Powder Set Holographic Laser Nail Powder Pigment Kit for $27.23 at Walmart
- Black nail polish or nail art pen – OPI Infinite Shine Iconic Collection for $14.49 at Beauty Brands
- White nail polish – OPI Infinite Shine Iconic Collection for just $14.49 at Beauty Brands
- Thin nail art brush or dotting tool – Nail Art Line Painting Brushes for $4.94 at Walmart
- Top coat – OPI Top Coat for just $11.99 at Beauty Brands
- UV lamp (if using gel polish for chrome effect) – Meidong Gel Dryer Lamp for Manicure UV LED Nail Dryer for $21.99
How To Apply: - Prep Your Nails: Clean, shape, and file your nails to your desired length. Apply a base layer to prolong polish life and preserve nails. Let it dry completely.
- Apply the Chrome Base: For a shine like a mirror, use chrome nail polish or chrome powder. Put chrome powder on top of a gel polish base, and then use a UV lamp to fix it.
- For Chrome Powder: To apply chrome powder to nails, apply a black or dark gel paint as a base, cure it, then massage it on with an applicator. Apply a topcoat and cure again.
- Create Ghosts Designs: Use white nail paint and a thin nail art brush (or dotting tool) to create miniature ghost forms on one or two accent nails. For the Ghosts: Create a spherical, wavy-edged design at the tip of the nail, leaving room for the eyes.
- Add Facial Details: After the white polish is dry, add the ghost’s eyes and mouth with black paint or a nail art pen. You can make the eyes round, scary, or cute, based on your taste. You can add other small features if you want to.
- Seal with a Top Coat: Seal the design with a top coat to protect your artwork and add shine to the entire manicure. If you want to preserve the chrome effect, make sure to use a gel top coat and cure under a UV lamp if using chrome powder.
In 2024, Halloween nail trends focus on creativity, mixing spooky themes with stylish designs. From glow-in-the-dark ghosts to stylish matte black finishes, there’s a look for everyone this season. Get excited to dive into the spooky season and boost your Halloween vibes with these fun nail ideas!